How to Install Gutter Guards (And Why It’s Best Left to the Pros)
Installing gutter guards is one of the most effective ways to protect your home from water damage, clogs, and costly maintenance. If you're curious about how the process works—or wondering whether you should attempt it yourself—we’ve broken it down below. But here’s the bottom line: while DIY is possible, proper installation makes all the difference in long-term performance.
At Touch Of Glass, we’ve installed over 20,000 feet of gutter protection across Calgary and surrounding areas. Our process is fast, precise, and backed by a lifetime warranty. Here’s what goes into a professional installation—and why many homeowners ultimately leave it to us.
Step 1: Clean Out the Gutters
Before any guard goes on, your gutters must be completely cleaned and cleared. That means removing built-up leaves, roof grit, pine needles, and sludge, then thoroughly flushing the downspouts to ensure there are no hidden blockages. This step also includes a full inspection for signs of damage, sagging, or poor drainage.
At Touch Of Glass, we don’t just guess, we use real-time video inspections so you can see exactly what’s inside your gutters and downspouts. You’ll know what we’re working with and what needs attention before the guards go on.
💡 For homeowners dealing with recurring buildup, seasonal clogs, or water stains on fascia boards, our Gutter Cleaning Services can help maintain performance year-round—even if you're not ready for gutter guard installation yet.
Why it matters: If debris is left behind, or if drainage issues go unnoticed, gutter guards won’t solve the problem. Instead, you could end up with water overflow, leaks, or blockages that get sealed in. Clean gutters are the essential first step to making sure your guard system works effectively—and keeps working long term.
Step 2: Make Necessary Repairs
Before gutter guards can be installed properly, your existing gutter system needs to be in working condition. Installing protection on a damaged or misaligned system can lead to serious issues like water overflow, foundation damage, and ineffective drainage, even with the best guards in place.
At Touch Of Glass, every gutter guard installation includes a full assessment of your current gutters, and we make all the necessary repairs before the guards go on. This ensures that your new protection system is built on a solid foundation.
Here’s what that process typically involves:
- Sealing leaks and joints with professional-grade gutter sealant to stop drips and prevent corrosion.
- Replacing damaged or worn-out sections that may be sagging, rusted, or improperly pitched.
- Re-aligning gutters for optimal water flow, especially in areas where water tends to pool or overflow.
- Reinforcing with hidden brackets, particularly in older systems where the hardware has loosened over time.
💡 If your gutters show signs of leaking, sagging, or pulling away from your home, it’s important to fix those problems first. You can learn more about how we handle these issues on our Gutter Repair Services page.
Even small issues like a slow drip or slightly off alignment can undermine the performance of a gutter guard system over time. That’s why we don’t cut corners. Every install is preceded by the right repairs, done with care by experienced technicians.
Step 3: Install the Gutter Guards
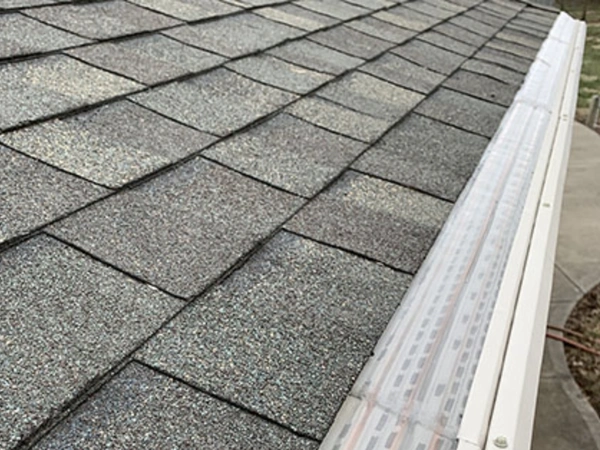
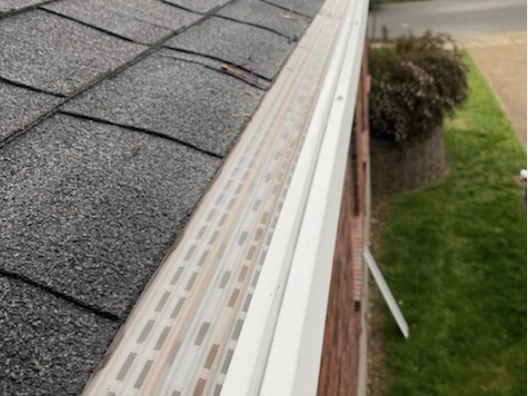
At Touch Of Glass, we provide expert gutter guard installation using Master Shield MicroMesh Gutter Guards - a high-performance system designed to work with your roof’s natural slope. These guards are made with a rust-proof aluminum frame and 50-micron stainless steel mesh - fine enough to block even roof grit and pollen while allowing rainwater to flow through freely.
Here’s how to install them, step by step:
- Positioning the Guard
Each section of MicroMesh is aligned with the pitch of your roof to match the slope perfectly. This ensures that debris doesn’t sit on top as it slides off naturally with wind and rain. - Tucking Under the Shingles
The upper edge of the guard is carefully tucked underneath your first row of shingles. This allows the system to integrate seamlessly with your roofline and stay firmly in place without disrupting your shingles or voiding your roof warranty. - Securing to the Gutter Lip
The lower edge of the guard is fastened securely to the outer lip of the gutter using stainless steel screws. This creates a snug, sealed fit with no gaps, preventing leaves, pine needles, and even fine sediment from entering the system. - Adjustments and Sealing
We inspect each section for proper angle and flow, ensuring smooth transitions around corners and downspouts. Any exposed seams or joints are sealed to prevent leaks or lifting during storms.
💡 Proper gutter guard installation is about more than just placing a screen, it's about aligning, securing, and integrating the guard so it works with your entire gutter and roofing system.
Unlike basic store-bought systems that lay flat and trap debris on top, Master Shield guards are designed to shed debris, not collect it. The angled mesh works with gravity and airflow to keep the system clear, even in heavy leaf or pine needle environments.
Pro Insight: If a guard is installed too flat or without the right support, water can overshoot the gutter completely or pool behind the mesh—defeating the purpose of protection. That’s why precision matters.
With every installation, we include:
- A full gutter and downspout cleaning
- Repairs and realignment where needed
- A video walkthrough of the finished system
- And a lifetime warranty you can count on
When done right, your guards won’t just block debris—they’ll protect your home for years to come.
Step 4: Final Inspection and Video Walkthrough
Once your gutter guards are installed, do a final inspection to make sure everything is secure and working properly:
- Check for gaps or loose sections that could let debris in.
- Run water through the system with a garden hose to ensure smooth drainage—watch for overflow or pooling.
- Inspect corners and transitions, where issues often occur.
- Make sure guards align with your roof’s slope so debris can shed off naturally.
Even with careful installation, it's easy to miss small issues that impact performance.
That’s why every gutter guard installation by Touch Of Glass includes a full water test, real-time video inspection, and a video walkthrough you can review. We make sure it’s done right and back it with a lifetime warranty.
Can You Install Gutter Guards Yourself?
Sure, with the right tools, a stable ladder, and plenty of time, some types of gutter guards can be installed by homeowners. But here’s what we see every day:
- DIY guards not sealed correctly, leading to water damage
- Guards not aligned with the roof, causing overflow
- Homeowners risking injuries from ladder work
- Inferior materials that don’t stand up to Calgary’s extreme weather
A proper gutter guard installation is more than a quick snap-on fix - it’s part cleaning, part repair, and part precision install.
That’s why all our installations come with a lifetime warranty and why hundreds of local homeowners trust us to do it right the first time.
Ready to Protect Your Home?
At Touch Of Glass, we install premium gutter guards with:
- A lifetime warranty
- A free gutter cleaning included
- Full inspections with real-time video
- Expert care backed by 17+ years of experience
📞 Call (403) 828-4509 or request your free estimate online - no pressure, just honest advice from Calgary’s trusted exterior cleaning pros.
Protect your home now. Never clean your gutters again.